Showing posts with label Doing it myself. Show all posts

08/09/2012

Coming up roses..

Happy Saturday my dears,

Has it been a scorcher where you are?

The universe was smiling down on me today. I sulked this morning because I had a serious craving for a boot sale..yes I crave them! Can't explain it. But I had booked a hair cut this morning and I had to go, I'm terrible at convincing myself to go because I hate going so having already booked it I really couldn't flake. Well would you believe it, when I walked out of the salon onto Chiswick high street with my OK but not perfect hair cut I spotted a boot sale on the green opposite the high street. Madness. It was completely one off, never been there before but there it was today, waiting for me. I found some treasures too, most of which have been added to my Etsy shop. Some of them stayed with me though of course.

Anyway, I am not here today to tell you about my latest finds. I am here today to finally share something creative that I have been doing.

It may have come to your attention that I am somewhat obsessed with rose prints, specifically vintage rose prints. I live and die for them, honestly I do. I have to fight against myself very hard to not cover my entire house in them. So I came up with a little compromise...rose decals. I found a supplier of rose decals/transfers and have filled my world with different patterns and prints. They are just perfect for putting a little extra something onto your plain glassware, furniture, plastic..whatever. I especially enjoy using them to beautify plain jars and glasses.

Do you want a peek?


With just a damp sponge and some heat these beautiful vintage style roses will stick to anything. It reminds me of the temporary tattoos we used to wear as children, except much prettier! Today I gave this £3 glass jug from a supermarket a bit of personality with a pretty floral bouquet. I saw one similar in an antique centre with six glasses but it was selling for £20. My jug is just a lovely now and much better on the old bank balance..


And here's those beautiful roses up close..


Now I just have to fight the urge to use rose transfers on everything! Seriously, if you put anything down in my house, chances are it'll end up looking rosey..

Have you discovered rose decals? How do you use them? Are you as obsessed with vintage rose prints as I am..shall we start a support group?

If you haven't paid a visit to my vintage emporium yet, do please stop by. I have filled it the brim with mismatched china and vintage wonderfuls.

With love,

Lexie


Instagram Pinterest

09/06/2012

Artful intentions

Hello ladies,

I hope I find you well on this breezy weekend. What's new petals? I am officially on holiday countdown! And as I am only counting working days, I am left with only 9 days!...NINE DAYS! Readers, I am unbelievably excited to spend two weeks in Cornwall..one of my most favourite parts of the world!

Holiday countdowns aside I was struck by creativity this afternoon so I finally tackled a small project that I have been thinking about for a while. It's funny how even the simplest of projects get put off longer than they should!

So, to the project in question. Have any of my fellow 'Mollie Makes' readers noticed the lovely fashion editorials in the last 3 or 4 issues? Go back and take a peek if you have not. It wasn't always the way, but lately the fashion spreads have been quite something. Ethereal, romantic and soft with lovely, romantic quotes against serene backdrops. Very very girly. When I saw some of the images in the last two spreads I immediately thought "I need to frame those"..and so I finally did.


I love these images, even surrounded by the dull brown of the photo frames.


I'm a real sucker for a good quote and these two caught my attention, and the script is beautiful too.


One thing was clear though, the frames just weren't living up to the soft pastel beauty of the images. So it was a case of floral patterned tape to the rescue!


And here they are now. The two floral prints are different enough to give each frame an individual touch but similar enough to make them look like they should be a pair.


I just love a rose print, don't you?


So what do you think lovely ladies? If you hadn't noticed these pictures before then maybe you will now. They really look quite special in frames. Now that I have a years subscription to Mollie Makes I may well end up with a wall of these images! My housemate might have something to say about that!

Have a splendid weekend won't you?

With love,

Lexie

x

Twitter Pinterest

04/06/2012

A bank holiday Ta-Dah

So on to part 2 of my busy bank holiday weekend.

How could I let a bank holiday pass by without doing some sort of DIY project!

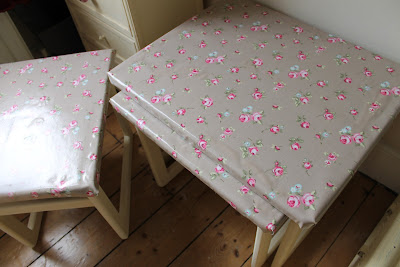
I was given a nest of tables by my dear old dad a few weeks ago. They were so not me! But I knew I could do something wonderful with them so I agreed to take them and give them a home. Truthfully, I desperately needed some side tables so I was quite happy to make this set of three work for me.

When it came to deciding what to do with the tables, well I didn't even look! I had already decided to find a way of covering the dreary tile tops and just happened to read a blog post at CherryHeart where she posted about some tables she had made over with oil cloth! Well there was my answer! And not only that, but during my trip back to Cheltenham two weeks later my friend L showed me a table that she had also made over with oil cloth using some 'no more nails' adhesive. It was all coming together.

I chose some beautiful oil cloth that would match both the cream paint I would be using and the reds in my lounge and today I got on with it.

Earlier today they looked a little like this..horribly brown and severely lacking in character...


And these were my supplies: Annie Sloan Cream paint, 'No more nails' adhesive and some good quality oil cloth. I went for a taupe colour with pink roses.


I covered the tops first by blotching the adhesive all over and then pressing the table onto the oil cloth. I then glued the edges down. Once the oil cloth was on I then painted the tables. It was all very very messy and I started to run out of patience after the first table!

Nevertheless, I am very happy with the finished products..


Do you like? I certainly do!!

Until next time lovely readers, enjoy the rest of your weekend.

With love,

Lexie

x

Twitter Pinterest

21/04/2012

I think they call it a Ta-Dah..

A short while ago I set myself a little project after being inspired by some lovely lovely pictures. Today was the day that I decided to get on with it. I was supposed to be visiting my beloveds in my lovely former home town of Cheltenham. My poor housemate got a case of the lurgies and is too poorly to drive us down. So, I decided to be productive instead and get cracking on beautifying my old chest.

I am a rather impatient person and I was fully aware when starting this project that I would get bored and impatient about half way through. Well, it turns out that I couldn't even last five minutes before the complaining set in. It seems that wallpaper is in fact,  the most hideous beast to work with when you're not pasting it on walls or using it in small quantities! Hideous! I got angry, I took it out on the wallpaper, the wallpaper didn't care. But thankfully I didn't give up. Damned if I was going to have a half finished chest even if I did have glue all over my hands and floorboards, paint in my hair and all down my arm.

A couple of hours later and I'm done. The only thing that kept me sane was the decision to paint some of the trickier fiddlier areas of the chest instead of papering them...

A few short hours ago the chest looked liked this on the inside..


Look at it all ugly, brown and grubby. I stripped as much of the old paper as I possibly could (tedious, tedious task)

It no longer looks like this! After fighting with some very pretty wallpaper for what felt like an eternity it now looks like this..


I am actually really really very pleased with my handywork! Don't get me wrong, if you look close enough you'll spot the imperfections...there are a few! But I am more proud that I followed it through and that it looks as lovely as I hoped. I think the white of the paper goes well with the clotted cream colour of the Annie Sloan paint and this little chest will definitely be coming to my bootsale with me in a couple of weeks...as a prop of course and definitely not to be sold.


What do you think? All I need now is an excuse to keep it open all.the.time!

If you're thinking of making over a similar piece, I used 3 metres of wallpaper with some watered down PVA glue and I got some beautiful lace crochet/lace trim for the lid edging. I peeled as much paper as I could and then vacuumed every inch to avoid getting gluey dusty, dirt everywhere.


Now I'm off to make some mini bunting, some not so mini bunting and other such beautiful things to sell at my stand.

Lots of love,

Lexie

x


Twitter Pinterest

11/04/2012

A project for Lexie

Hello petals.

Is anyone else as confused about what day it is as I am? Totally lost!

So I have set myself a little project, it doesn't take much for me to get carried away..I just need to see one little picture and the cogs get turning, the creativity stirs and an idea gets under my skin. I sense that some of you can relate!

I have a chest..


It has seen three different coats of paint and now it sits prettily in my living room adorned in nick nacks. Now, for 6 months it has sat in the same spot and as far as I knew...it has been locked, impossible to open. I decided last week that I wanted to try and get it open! Well, would you believe after trying to research the type of lock and how to pick it..all it took was some pressure. It wasn't locked..it's just old. So I got it open and carefully peeked inside. The inside is in a terrible state, the paper is all crispy and needs removing but it really is a lovely chest. I'll peel off the paper, I thought, and I'll paint the inside. Perfect. Easy...No.

So just when I think I've got myself a little plan, along comes Pinterest with all it's pretty pictures and rose tinted loveliness to tempt me and of course, I spotted something, a better something. A much more complicated refurbishment for my chest. Sigh, My mind runs away with my heart and suddenly I'm convinced before I've even had a chance to protest.

I have decided to wallpaper the inside of my chest. Why? Because in my mind it will looks just like this..

Image courtesy of My Vintage Party


Complete with the lovely lace trim. Sadly I couldn't find a blue paper as lovely as this one but I have settled on a pretty Cath Kidston paper instead (Got to love Ebay).

So wish me luck on my project, and do please share an advice you have if you have done something similar.

With love,

Lexie


Twitter Pinterest

22/02/2012

Productivity 1 Laziness 0

A good evening to you all..

How goes your week so far? I've been so busy being busy that I forgot to stop by and tell you how busy I was last week. In fact, I am almost completely sure I have never been so productive. Last week marked my official induction into the Annie Sloan paint club, with a new wooden TV stand waiting to be painted I knew I wanted a really good paint finish so why the hell not hey?


I gave it a go, and while I do think the paint is good...I am not and therefore I probably did not use it to its full potential, at first it went on too thin and then a second layer made it far too thick...by the time I came to painting my second piece I managed a little better but I am still no Annie Sloan aficionado...


I also took some of the new paint to an old thrift store chest that I picked up a fair while ago..when I got it, it was in a dire state and since then I have painted it three times. Now that it is all painted in Annie Sloan cream I like it a lot more than I did...although, I remain unconvinced..I'm thinking a layer of the dark wax might break up some of the brightness? 


Painting wasn't my only endeavor these past days, I also fought and won a war against my bathroom limescale. Did you know my lovelies that white vinegar is an absolute miracle. You need never buy any kind of limescale remover again. Vinegar is the way forward..but enough of that.

I also found a superb bread recipe and officially baked my first loaf of bread!! I am officially on the way to being the cottage dwelling, jam and bread making queen that I always wished I could be...without the cottage..or the jam! One step at a time folks! Trust that I will be posting the bread recipe very soon..it is, honest to blog, the easiest recipe I have seen.

Now I must away my petals, did you know that this Saturday it will be time to go and see 'All New People' in the westend...it seems like only yesterday that I was blogging about it being one of my highlights of 2012 and now the time has come..the rest of the year is sure to follow behind just as quickly...now there's a thought.

Sweet dreams readers,

Lexie

x

04/09/2011

Befores and afters

Before I go back into my writing cocoon I wanted to share my Sunday paint project. I rescued this dark wood chest with a padded lid about 3 years ago and I had never thought to do anything with it. Even though it was a little dowdy, it had an air of antiquity about it and I was quite fond. But, while on my paint buying expedition last weekend I discovered a lovely shade of country green by Craig and Rose as part of their 1829 range. I didn't buy it last weekend but over the week I got to thinking that maybe this chest would look nicer in green, and maybe I could re cover the seat with my bargain red country rose fabric from Laura Ashley and maybe, even though I had never done it before, maybe it would look alright.

So here's the before:

It's the dark chest at the forefront of this picture, very dark wood and
a tapestry like cover on the lid.

And here it is, stage one completed..


I am thrilled with it, the green looks lovely and as the chest was so dark and a little varnished the paint has dried to create a real shabby look without any sanding. I was going to give it a second coat but I love the effect! Stage two will be to attach a trim around the edges of the seat and then it will be complete. As with most things that I do, it's a little rough around the edges but therein my friends, lies the character! The paint colour is 'Deep Adam Green' by Craig & Rose...it's a gorgeous colour, really!

Now I am off to write again, I have paint all over my hands too so I feel like a real artist today!!

Have a wonderful Sunday.

x


What Lexie saw..

Hello all,

Writing is still occupying my mind and I am enjoying every second but I thought I would make time to stop by and share some wonderfuls from my weekend.

We paid a visit to the Live Craft fair in Great Missendon yesterday just as a spur of the moment kind of thing. It was fairly small and while many of the crafts on display were wonderful, they were not really my kind of area. There was very little in the way of needlework or textiles. However, plenty of wood turners and one in particular that had a lovely mix of handmade wooden furniture and antiques on display. I snapped some lovely pieces for inspiration and thought I would share:

This dresser was the nicest shade of country green and the fabric was just perfect.
This is actually a similar look to one that I hoped to achieve with a piece of my own furniture
and seeing this piece convinced me that I needed to get on with it soon (Funnily enough
I planned to use a similar shade of green too...more on that later)

This chair was decorated with the nicest print, so eye catching I
had to capture it.

Aren't they lovely pieces? And such a wonderful talent too.

09/08/2011

Project

Good evening all,

I hope this finds you well, somewhere quiet and free from riots! Today has been a strange day here in London, it really is the most surreal place to be right now!

Nevertheless I am distracting myself with better brighter things, today much of the town where I work was evacuated and my office closed for the day at 2pm as a precaution so I've had some free time today. On my way home I relished the fact the it was early enough for the thrift stores to still be open and popped inside the best one where I found a tub full of little bags of buttons (Oh but to have 10 minutes alone and room to empty the whole bucket of buttons on to the floor so that I could find the best ones) and another beautiful cake plate to add to my collection.

I also took some time to photograph that old wardrobe that has now been painted and de-uglied! Care to take a little look? No looting it though please!


Shabby and lovely


Love this colour

Home made garland to add some colour


Voila! It's still very art deco in shape and style (yuck) but at least it is no
longer mahogany!

24/07/2011

One sunny Sunday

The sun has shone unreservedly this fine Sunday for the first time since I was on holiday and I have been a busy little bee. I am still battling the post holiday blues (They usually disappear right before my next holiday) and so I decided to paint my bargain finds from yesterday. So away to my sunny little garden I went to work some magic on the bargain dresser top...


I painted it using one of the Laura Ashley samples I recently purchased..the official colour is 'Pale mauve' but it seems to be more pale, less mauve. I imagine another coat might bring out its mauve side but I am pretty content with the pale, it goes well with my kitchen.


So now it hangs, decorated in my finery and some freshly cut roses to boot.


The old jam jar that I recycled is doing well as a vase, I keep going back to it! The orange rose is a David Austen Rose called 'Evelyn' which is one of my favourite girls names. It smells of apricots and peaches, no word of a lie.

I also managed to paint my new old chest but I am currently unsatisfied with the finished result so I'll get back to you on that one.

Love,
Lexie

23/07/2011

Where there is one...

The rotten old chest that may or may not contain a body part of some kind..(I hope not)..was not the only item that I found in the thrift store today. You may remember that I posted this a while back about desperately wanting another wall dresser for my kitchen to display plates and such like, the idea soon dwindled and I satiated  my sudden need with a small herb rack that I painted and hung on the wall. It was ok, but never perfect. I hadn't bothered to look ever since but today, in the corner of the back room at that thrift store..I saw a dresser top...compact enough to fit in the car, ready to paint and just about perfect. Not only that the price was ridiculous in the very best of ways. Needless to say, I snapped it up, found a space for it and went about arranging my plates and things. I plan to paint it one of these days using my Laura Ashley sample paints, I know it'll look lovely.

What do you think?


It will look even nicer when it's newly painted and it fits so well over my table. Not too domineering and just the right size. Oh, how I love finding practical, wonderful things to prettify!

Have a lovely Saturday evening won't you!

Lexie

I see a project...

One thing I can guarantee about my working day is that I will have to walk past my two local thrift stores in the morning on my way to the tube. This is both good and bad in equal measures and has upon occasion caused great heartache. 

While passing the windows is always a delight, there are times when I see something at a great price that I simply must have but can't because the shop is closed and I need to get to work...inevitably, these items will be gone by the evening and certainly by the time the weekend finally arrives.

Worse still, are the occasions when people have left their unwanted belongings at the doors of the shop ready for it to be sold to whichever thrifty soul feels the need to take it home. This is not usually a problem, unless someone has left something that I simply must have...then comes the horrid realisation that I don't have the time to take it back home before going to work..and even worse- that it will be probably be priced at an amount far greater than I can afford and even if I could..it'll most likely be gone before I can even withdraw the cash. It hurts! 

It has only happened a few times- the last time it was a beautiful chair, left sitting outside the shop..I don't recall the specifics of it, just that it was wonderful and I wanted it. But naturally, it spent all of two days in the shop window before being sold to someone who didn't have to be at work all day every day.

Well, it happened again last Monday when I spotted a tatty old, unwanted chest leaning against the shop door at something past 7 in the morning. I so almost stopped in my tracks and dragged it all the way back home but I absolutely could not! I pined and pouted all the way to the tube. My mum had one almost identical and it brought back so many wonderful memories that I knew I needed it in my life.

The next day I spotted it in the shop and there, I hoped, it would stay until Saturday when I could get my hands on it. Well, you know what? Today, as I wondered around the shop, I found it...tucked away in a little corner looking sorry for itself and now, after paying a very small price, it is mine...and here it is..


It's a little worse for ware from being stored somewhere damp, the handles had rotted and needed removing and it needs a good clean. I plan to paint the brown parts but leave the wood as it is because I love the effect of the worn wood..wonderfully shabby.

Slightly perplexing though, the chest is locked shut and there is something clunky inside...should I be worried? I'll keep you posted on how this one turns out.

This wasn't the only project that I picked up today, stay tuned for item number two.


19/06/2011


I've had another productive Sunday- I didn't have much of a choice today as the weather has been spectacularly rubbish. I tackled a new craft- partly because I wanted to add it to my repertoire and partly for my next craft swap with another talented friend of mine that for purposes of keeping the surprise intact, shall remain nameless. Fabric buttons are so adorable don't you think and as it turns out, very simple to make although it did take some trial and error!


After a little experimentation I was left with some darling little Cath Kidston buttons. The ones attached to the blue starry card are for my next craft swap...and the bigger ones are just left overs! Now all I need to do is purchase tonnes of buttons from ebay and make more and more!

The blue card, by the way, was cut from the back of some cupcake boxes (from M&S). The boxes were far too pretty to throw out so I cut up as much of it as I could...just goes to show that you can recycle and upcycle anything if you keep an eye out!


Craft swaps are a fun way to share your talents with others by giving handmade trinkets in return for other handmade trinkets. I am very lucky to know a fair few crafty ladies and so craft swapping means I get wonderful, unique items by my favourite talented ladies. My first craft swap was a long time in the making- we arranged it back in January and I finally sent my finished product out last month! Thankfully the responses were good.


 These are the little treasures that I managed to put together complete with gift tags and vintage postcards. Both key rings were personalised in different ways to make them extra special! 

I am patiently awaiting my turn to see what my lovely friends will come up with for me! I will definitely be posting about them whatever they are.

Why don't you try a craft swap with your friends?

12/06/2011


Project of the day number 2 is an idea that could work for anyone. Once again, it came from a sudden desire to change something in my kitchen, but the results are quite pleasing.


If you have one of these cork notice boards then you might know how ugly they are. I have one in my kitchen and while staring at the horrid brown tones of the cork beneath all my collections of cards and pictures I decided it could be so much more attractive and so here is my solution to a boring, ugly notice board.

I used one of the downloadable wallpapers from the  Cath Kidston site:


I chose this one, but there are plenty of others out there, they don't need to be Cath Kidston. I printed 4 sheets- 3 for the main body of the board and one to cut up and fill in the gaps at the bottom. Take care to match up the images so it looks perfect. Start by working along the top, place the three sheets vertically side by side. Use glue, tape of pins to affix them. If you are working with a regular rectangular board then you will be left with a strip of bare board at the bottom. Fill this in by cutting the 4th sheet and doing a little jigsaw work.

And once all the cork is filled you will have created a lovely background for your important notes, messages and reminders and no more horrible cork brown. The wood is also un-varnished on most of these kinds of boards so you can paint them in whatever colour or pattern that you wish. Mine looks a little something like this:


Now, instead of that brown colour behind my postcards and letters I have vintage roses peaking through and when I get a second I will paint the frame in a pretty, shabby chic colour to match the print.

I also made a little pocket using a different print where I can keep all my letters and notes:


This was fairly easy to make, I cut the paper vertically a little bit further than half way down. I folded in the sides and the bottom and attached pins at all four corners underneath the folds but not through the front.


Next I attached the pouch starting with the bottom corners:


Fold the pouch upward and attach the top two corners for your finished product. I attached a doily frill trim to mine for extra embellishment and I'm very happy with the results. Not at all bad for some spontaneous DIY-ing on a Sunday.

I also made a skirt from an old dress simply by cutting along the waistband and made some paper bunting from some printable wallpapers and some more of the Cath Kidston desktop wallpapers. Phew!

It just shows that it is always worth remembering that before you get rid of something, consider upcycling it to make it exciting, new and improved!


Related Posts Plugin for WordPress, Blogger...